Prepare concert livestream
Thank you for your interest in WebstageMusic, the virtual concert stage.
To stream your concert on WebstageMusic you need streaming equipment: computer, microphone, webcam, and streaming software. The recommended upload speed is 5 Mbps. If you have already streamed on Youtube, Facebook or Twitch you can take over the setup 1:1, you just have to enter the streaming software OBS instead of the stream URL and stream key which you will get from us after setting up your concert. Details about the setup of the free streaming software OBS for streaming on WebstageMusic can be found in the streaming guide below.
If you need assistance in setting up or configuring your streaming equipment, send an email to [email protected]. Audio and video specialists from our network are available to answer your questions. We can also help you find a technician to film and stream you or your ensemble/band at the concert.
You do not have to take care of an AKM registration of the livestream. We are the organiser and have a blanket licence for livestreaming both concerts in front of an audience and without an audience. We bear the flat monthly costs from our 25% share. If you stream a concert with an audience, you have to register it with the AKM, and you also have to take care of any further rights that may be necessary. If you play pieces by other artists, please mention them in the programme of your concert.
For an appealing promotion of the concert you need high quality photos for your profile and the concert. Think about a convenient date, you should announce the concert livestream on Webstagemusic at least two weeks before the concert date.
After these preparations you are ready for your first WebstageMusic concert livestream!
Announce a concert livestream
You can announce a concert livestream by clicking on the button 'Announce stream'. Prerequisite for this is that you are registered and logged in with your own username. If this is not the case press the button 'Login' or 'Complete profile' to do this. If your registration is successful, a user icon will appear next to 'Announce stream'. Clicking this icon will open a menu with your username, tickets, concerts and logout.
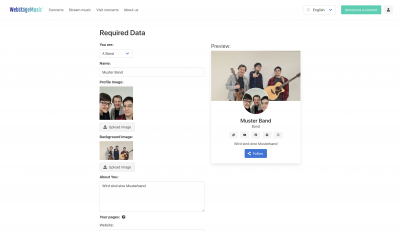
When your first concert livestream is announced, you create your profile and enter your payment information. You can create a profile as organizer, musician or band/ensemble. In the profile you enter the name, a short bio and links to other sites. Make sure that the picture and background image are of good quality.
Clicking on 'Continue' will take you to enter your bank information. At the beginning of the entry of the payment information you can choose whether you want to use a private address on the invoice and a private account for processing or as a company with a company address and company account. Follow the instructions of the payment service provider Stripe when entering the other data. After entering your bank details, your identity must be verified. Follow the instructions here as well.
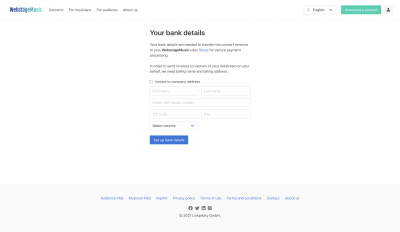
It may happen that shortly after the identification you will receive an e-mail from us asking you to submit further data (e.g. photo of an ID). Click on the link provided in this email to do so. Only after submitting this data you will be able to receive payments.
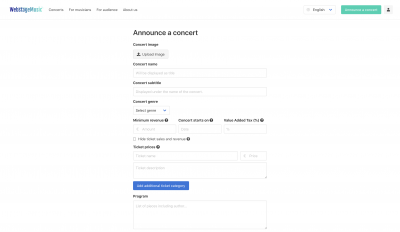
After registration you can create your concert livestream by entering title, subtitle, genre and program. It has proven useful to include social media links in the description of the concert. If you are the promoter, you should include the information about the act in the concert description. Pay attention to a good image quality of the concert picture.
You determine the minimum revenue and the ticket prices. It has proven to be a good idea to offer several categories of tickets and also more expensive tickets that include fan merchandise, CDs, etc. Let yourself be inspired by the past concerts on the homepage.
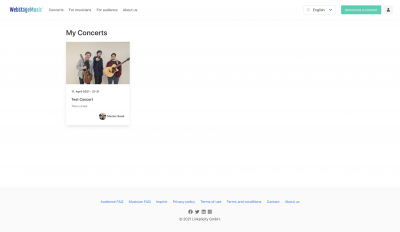
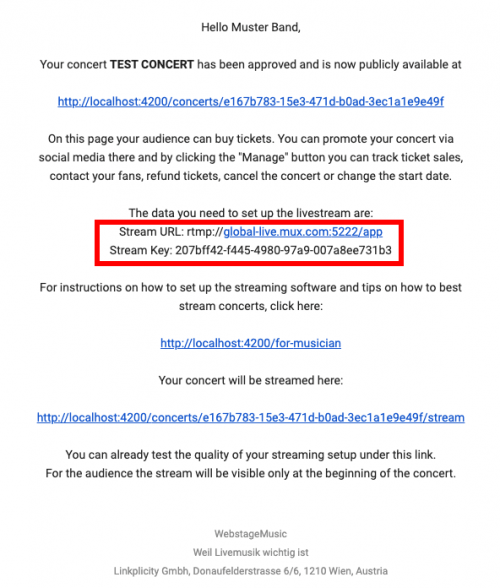
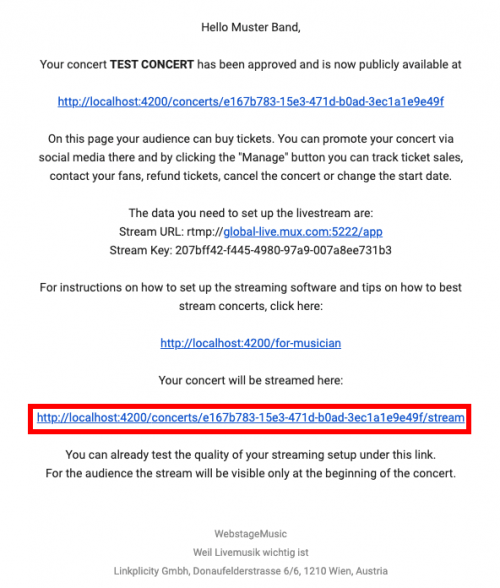
Once you have entered all the necessary data, you must save the concert livestream. Click on 'Save'. Only now you have the possibility to publish the concert or to leave it in editing. After saving, you can access and edit your saved concerts at any time under 'My concerts'. If you are ready to publish the concert livestream, click on 'Publish'. You will then receive a message that the concert livestream you have created still needs to be checked by us. This can take up to two working days. As soon as your concert livestream has been approved, you will receive a notification from us by e-mail. This mail also contains the stream URL and stream key needed to set up the stream. You can change the concert description on your own after publication, but not the desired destination and ticket prices.
Manage concert
With the approval of the concert livestream you can do various administration tasks under 'Manage Concert'. Under 'Stream Information' you can see the stream URL and stream key, which you have to enter into the streaming software. To make this easier you will find a 'Copy' button next to the information. You should test before the concert if your streaming setup works and if the quality of the transmission fits. We are happy to support you with testing, please contact us for an appointment at [email protected].
If you need support with streaming, you can create a technician account under 'Users'. The stream technician can support you in streaming by viewing the test stream and starting/stopping the live stream. Furthermore you can assign five free tickets under 'User' by entering the email address.
Under 'Stream Information' you will also find buttons for 'Change Start Date' and 'Cancel'. With 'Change start date' you can move the concert. Enter the new date and a message to the customers. They will receive this in the notification mail, in which they will also be informed about the possibility of cancellation. When canceling the concert, you specify the reason for cancellation. In this case, the ticket prices will be refunded in any case.
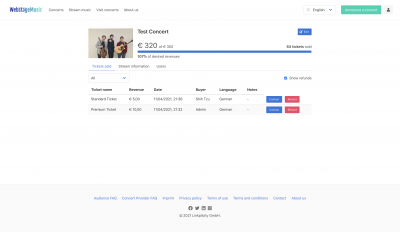
Under 'Sold tickets' you can track your ticket sales per category. By clicking on 'Contact' you can send a message to the customer, and by clicking on 'Refund' you can arrange for the ticket price to be refunded. Under 'Unread messages' you can see messages you have received from customers and reply to them.
Promotion
You should inform your fans about the concert livestream at least three times before the concert via social media and other channels. As a support you can use the social media buttons on the concert page. At least one post should be a promotional video with a duration of less than one minute. Don't forget to include the link to the concert and to mention that you have to pay for the livestream.
We will support you in your promotional activities by sharing your posts and own posts with our fans and subscribers and in the newsletter. Contact us at [email protected] to coordinate the campaigns optimally.
Experience shows that customers buy late, often on the last day or during the concert. Therefore - do not get impatient if the desired goal is not reached immediately after the announcement.
Stream concert
In order to be able to react flexibly to possible delays, the stream does not start automatically at the beginning of the concert. You start it by clicking on the button 'Start stream' in the upper right corner of the stream window. There you will also find the button 'End stream', which you can use to end the concert.
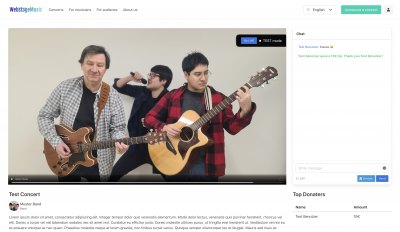
The chat will be opened automatically one hour before the concert starts. You should welcome the audience in the chat 15-30 minutes before the concert starts. After the end of the concert the chat will be open for another hour.
Don't panic if there are problems with the internet connection. The system will automatically reduce the quality if the internet gets weaker and will resume operation after a possible failure on its own. The message 'Stream is loading' will then appear.
Finalize project
As soon as the concert livestream is finished according to the agreement, we will release your share of the collected amount (proceeds from ticket sales and tips). Since it takes time for the payment provider to process the revenue, the amount will be available in several installments within 8 days. On the administration page of your concert you can see the amount of your 75% share of the ticket and donation income, how much of it you have already collected and how much is currently available for transfer. By clicking on 'Transfer to my account' you transfer the transferable amount to your account. For the 25% share of Linkplicity you will receive an invoice via mail.
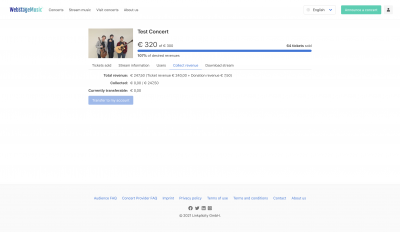
Under 'Download stream' on the administration page of your concert, the video of the stream is available for download under the button of the same name. We create a highlight video from this, which we add to your concert under a highlight link and thus advertise you on the WebstageMusic homepage. Under 'Show Chat' you can see the chat history of your concert.
Streaming via computer/laptop
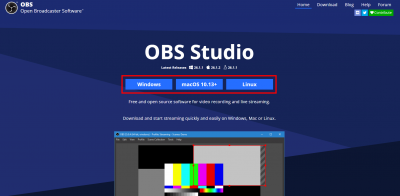
For streaming with a computer, free software programs like OBS are suitable.
Download link: https://obsproject.com/de
To start the download, you just need to select your computer's operating system. The download will start automatically afterwards.
After successfully installing and opening OBS for the first time, you will see a window that allows you to select the intended use of the program.
Select the top option here „Optimize for streaming, recording is secondary“ so that OBS can configure itself accordingly.
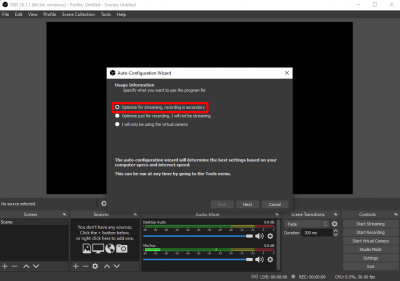
Click „Next“ afterwards.
You can now choose your desired video settings. It is recommended to keep the options preset by OBS.
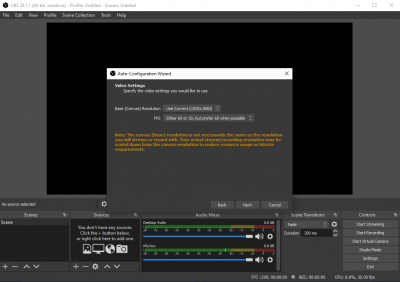
Click „Next“ afterwards.
You now need to select the stream information. For the platform, click on the box to the right of „Platform“, and select the „Custom ...“ option.
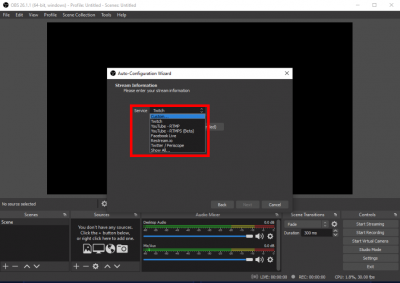
Now you get the option to enter a server (stream URL) and a stream key (stream key). This information is included in the email you received when you approved your concert.
Now enter these in the fields provided.
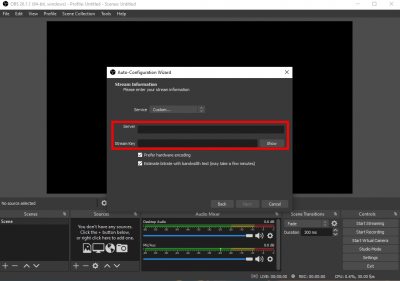
After entering the data, the following window will open.
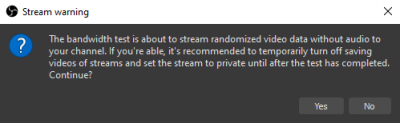
Click „Yes“ to allow OBS to complete the configuration with the most optimal settings. This may take a few seconds to minutes depending on the device.
Once the configuration is complete, click Apply Settings.
Add recording devices
It's time to connect your recording devices to OBS. To do this click on „+“ under sources.

You can now connect audio and video devices to OBS.
To start the stream click on „Start Stream“
Stream via smartphone
There are several apps available for streaming via a smartphone. For this tutorial, we will use the app „Prism Live Studio“.
Download link Prism Live Studio (Android): https://play.google.com/store/apps/details?id=com.prism.live
Download link Prism Live Studio (iOS): https://apps.apple.com/at/app/prism-live-studio/id1319056339
After successful installation, open the app. On the home page, you will see various log-in options. Log in with your preferred method. This will not affect the live stream in any way.

After logging in, you will be prompted to allow the app access to your camera, microphone and media on your smartphone. Make sure you allow this for your camera and for your microphone. If you want to save your live stream to your smartphone after it ends, accept access to your media as well.
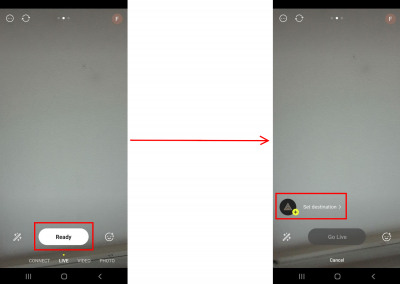
You will now see the following on the screen. To start the live stream, swipe your finger to the right.
1. To start the live stream, tap „Ready“.
2. Tap on „Set destination“ afterwards.
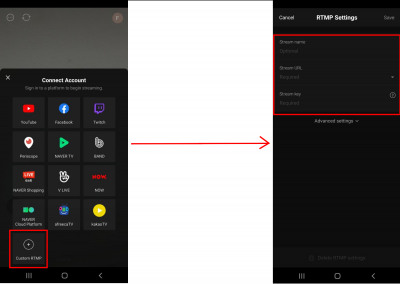
3. Tap on „Custom RTMP“
4. Now enter the stream name (freely selectable), stream URL and stream key. You received these in the email about approving your concert.
[object Object]

After entering the data tap on „Save“. You can now start your live stream by tapping on „Go Live“.
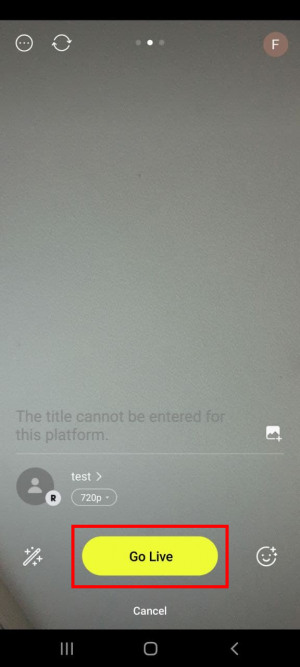
Before tapping „Go Live“, make sure you have set the camera orientation you want, as this will not be possible after the stream starts.
Access the stream
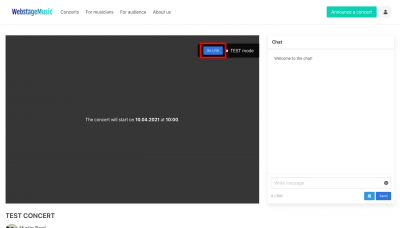
Note that you can start the livestream before the date and time specified when your concert was announced. This way only you can see your stream. This is a test stream.
To get to your stream there are 2 ways.
1. via the approval email of the concert.
2
Via webstagemusic.com
- Click on the profile icon in the upper right corner
- Click on „My Concerts“
- Now select the concert you want to stream for
- Click on „Manage“
- Click on „Stream information“
- Now click on „Go to stream page“
When you start the stream, you will automatically be in test mode. In this mode, only you will see your stream, so you can make all the necessary preparations. Once you are ready to start your stream, click on „Go LIVE“. This is possible at the earliest 10 minutes before the specified start time.
You can pause your stream at any time. To do so, click on „Pause“. A message will appear on the screen for all viewers that the stream has been paused. To resume the stream, click „Resume“.
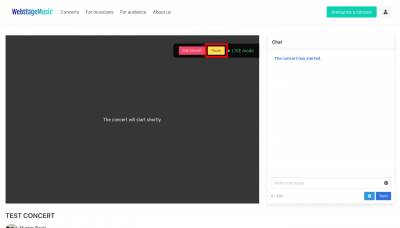
To end your stream, click „End Concert.“

Note that even after you end the stream, the chat area will remain activated for another hour.
If you don't manage to start your stream at the specified time, you can still join late. However, in this case it is recommended to change the start time manually and inform the viewers that there will be a delay and its reason.
You can do this under „Stream information“.
Click on „Change start date“. A window will open in which you can enter a new date, time and reason for change for your concert.
On the administration page of the concert you can also track ticket sales, cancellations and exchange messages with the audience.
Note that even if you enter your stream late, you are still in test mode. To go live click on „Go LIVE.“
For further questions, contact us at [email protected].